0%

下載 Arduino IDE

Arduino 官方網站 下載 Arduino IDE AppImage。

推薦可以用 Gear Lever 管理 AppImage:

1
2
3
4
5
6
7
8
9
# Install Flatpak on Ubuntu (if you do not have it yet) by running:
sudo apt update
sudo apt install flatpak

# Add the Flathub app repository by running:
flatpak remote-add --if-not-exists flathub https://flathub.org

# Install Gear Lever from Flathub with the command:
flatpak install flathub it.mijorus.gearlever

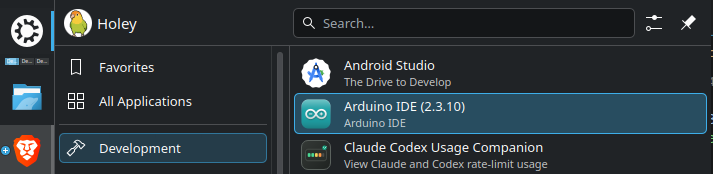
安裝完後開啟 Gear Lever 並將 AppImage 拖曳進入視窗即可。

雖然 AppImage 可以通過 Gear LeverLaunch 執行,但若有出現 Javascript 相關 error 的話可以嘗試直接從 Application List 上開啟。
Arduino IDE 2.3.10

安裝 ESP32 開發板套件

  1. 開啟 Arduino IDE:

    1
    File → Preferences
  2. 在 Additional boards manager URLs 加入:

    1
    https://espressif.github.io/arduino-esp32/package_esp32_index.json
  3. 接著開啟:

    1
    Tools → Board → Boards Manager
  4. 搜尋:

    1
    esp32
  5. 安裝:

    1
    esp32 by Espressif Systems

選擇正確開發板

JC4827W543C 不會在 Arduino IDE 中直接顯示自己的型號,請選擇:

1
Tools → Board → esp32 → ESP32S3 Dev Module

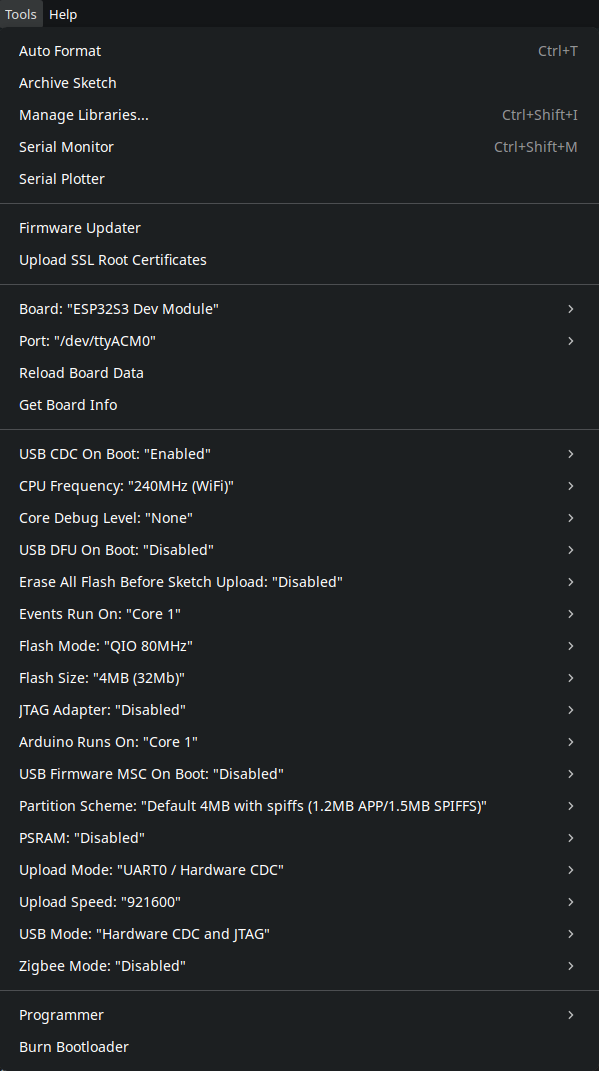
建議設定如下:

Arduino IDE 選項 設定
Board ESP32S3 Dev Module
USB CDC On Boot Enabled
CPU Frequency 240MHz (WiFi)
Flash Size 4MB (32Mb)
PSRAM OPI PSRAM
Partition Scheme Default 4MB with spiffs
Upload Speed 921600
Port /dev/ttyACM0

修正 Kubuntu 序列埠權限

假如遇到 permission defined 問題:

1
Permission denied: '/dev/ttyACM0'

代表目前使用者沒有存取序列埠的權限,需要將 user 加入 dialout 權限:

1
sudo usermod -aG dialout "$USER"

並重新登入(登出後登入、或重新開機)後,確認是否已經在加入 dialout 權限(輸出應包含 dialout):

1
2
$ groups
... dialout ..

再檢查裝置權限:

1
ls -l /dev/ttyACM0

通常會類似:

1
crw-rw---- 1 root dialout ... /dev/ttyACM0

基本上傳測試

請先從 Tools 下確認幾項 Arduino 設定:

1
2
3
USB Mode        → Hardware CDC and JTAG
USB CDC On Boot → Enabled
Upload Mode → UART0 / Hardware CDC

tools-settings

確認無誤後,驗證並上傳以下程式(或本站下載):

1
2
3
4
5
6
7
8
9
10
11
12
13
14
15
16
17
18
19
20
21
22
23
24
#include <Arduino.h>

void setup() {
Serial.begin(115200);
delay(1500);

Serial.println();
Serial.println("JC4827W543C started");

Serial.printf("Chip: %s\n", ESP.getChipModel());
Serial.printf(
"Flash: %u MB\n",
ESP.getFlashChipSize() / 1024 / 1024
);
Serial.printf(
"PSRAM: %u MB\n",
ESP.getPsramSize() / 1024 / 1024
);
}

void loop() {
Serial.printf("Running: %lu ms\n", millis());
delay(1000);
}

上傳完成後開啟 Tools → Serial Monitor(或是從 Arduino IDE 右上角按下 icon 開啟):

icon-of-serial-monitor

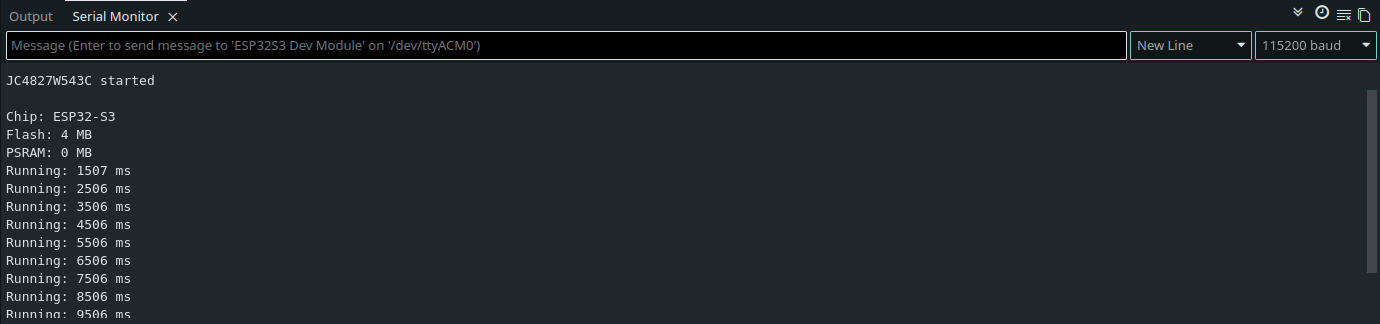
鮑率選 115200,正常情況應看到類似:

1
2
3
4
5
6
JC4827W543C started
Chip: ESP32-S3
Flash: 4 MB
PSRAM: 8 MB
Running: 3000 ms
Running: 4000 ms

01_print_message

LCD 顯示測試

安裝 Arduino_GFX

Arduino IDE 左側開啟 Library Manager,搜尋:

1
GFX Library for Arduino

安裝作者為:

1
Moon On Our Nation

板子範例庫明確使用 GFX Library for Arduino 1.4.6;為了先確認硬體正常,建議先安裝該版本。

上傳螢幕測試程式

驗證並上傳以下程式(或本站下載):

1
2
3
4
5
6
7
8
9
10
11
12
13
14
15
16
17
18
19
20
21
22
23
24
25
26
27
28
29
30
31
32
33
34
35
36
37
38
39
40
41
42
43
44
45
46
47
48
49
50
51
52
53
54
55
56
57
58
59
60
61
62
63
64
65
66
67
68
69
70
71
72
73
74
75
76
77
78
79
80
81
82
83
84
85
86
87
88
89
90
91
92
93
94
95
96
97
98
99
100
101
102
103
104
105
106
107
108
109
110
111
112
113
114
115
116
117
118
119
120
121
122
123
124
125
126
127
128
129
130
131
132
133
134
135
136
137
138
#include <Arduino.h>
#include <Arduino_GFX_Library.h>

// JC4827W543C 螢幕解析度
constexpr int SCREEN_WIDTH = 480;
constexpr int SCREEN_HEIGHT = 272;

// 背光控制腳位
constexpr int TFT_BACKLIGHT = 1;

/*
* JC4827W543C QSPI 接線
*
* CS = GPIO45
* SCK = GPIO47
* D0 = GPIO21
* D1 = GPIO48
* D2 = GPIO40
* D3 = GPIO39
*/
Arduino_DataBus *bus = new Arduino_ESP32QSPI(
45, // CS
47, // SCK
21, // D0
48, // D1
40, // D2
39 // D3
);

/*
* NV3041A 螢幕控制器
*
* GFX_NOT_DEFINED:沒有獨立的螢幕 RESET 腳位
* 0:畫面旋轉方向
* true:IPS 螢幕
*/
Arduino_GFX *panel = new Arduino_NV3041A(
bus,
GFX_NOT_DEFINED,
0,
true
);

// 建立 480 × 272 畫布
Arduino_GFX *gfx = new Arduino_Canvas(
SCREEN_WIDTH,
SCREEN_HEIGHT,
panel
);

void setup()
{
Serial.begin(115200);

// 最多等待 USB CDC Serial 10 秒
unsigned long serialStart = millis();

while (!Serial && millis() - serialStart < 10000)
{
delay(10);
}

Serial.println();
Serial.println("JC4827W543C display test starting...");

// 開啟背光
pinMode(TFT_BACKLIGHT, OUTPUT);
digitalWrite(TFT_BACKLIGHT, HIGH);

// 初始化螢幕
if (!gfx->begin())
{
Serial.println("Display initialization failed");

while (true)
{
delay(1000);
}
}

Serial.println("Display initialized");

// 清除畫面
gfx->fillScreen(RGB565_BLACK);

// 上方藍色標題列
gfx->fillRect(
0,
0,
SCREEN_WIDTH,
70,
RGB565_BLUE
);

// 標題
gfx->setTextColor(RGB565_WHITE);
gfx->setTextSize(3);
gfx->setCursor(45, 22);
gfx->println("JC4827W543C");

// 中間文字
gfx->setTextColor(RGB565_GREEN);
gfx->setTextSize(3);
gfx->setCursor(75, 115);
gfx->println("Hello Kubuntu!");

// 底部文字
gfx->setTextColor(RGB565_YELLOW);
gfx->setTextSize(2);
gfx->setCursor(105, 180);
gfx->println("ESP32-S3 + Arduino");

// 畫出彩色測試方塊
gfx->fillRect(105, 220, 50, 30, RGB565_RED);
gfx->fillRect(165, 220, 50, 30, RGB565_GREEN);
gfx->fillRect(225, 220, 50, 30, RGB565_BLUE);
gfx->fillRect(285, 220, 50, 30, RGB565_WHITE);

// Arduino_Canvas 必須呼叫 flush() 才會顯示
gfx->flush();

Serial.println("Test screen rendered");
}

void loop()
{
static unsigned long previousMillis = 0;

if (millis() - previousMillis >= 1000)
{
previousMillis = millis();

Serial.printf(
"Running: %lu ms\n",
millis()
);
}
}

觸碰螢幕測試

安裝 CST816_TouchLib

  1. 開啟 mjdonders/CST816_TouchLib 專案。

  2. 選擇 Code → Download ZIP

  3. Arduino IDE 開啟:

    1
    Sketch → Include Library → Add .ZIP Library
  4. 選擇下載的 ZIP。

上傳觸碰螢幕測試

驗證並上傳以下程式(或本站下載):

1
2
3
4
5
6
7
8
9
10
11
12
13
14
15
16
17
18
19
20
21
22
23
24
25
26
27
28
29
30
31
32
33
34
35
36
37
38
39
40
41
42
43
44
45
46
47
48
49
50
51
52
53
54
55
56
57
58
59
60
61
62
63
64
65
66
67
68
69
70
71
72
73
74
75
76
77
78
79
80
81
82
83
84
85
86
87
88
89
90
91
92
93
94
95
96
97
98
99
100
101
102
103
104
105
106
107
108
109
110
111
112
113
114
115
116
117
118
119
120
121
122
123
124
125
126
127
128
129
130
131
132
133
134
135
136
137
138
139
140
141
142
143
144
145
146
147
148
149
150
151
152
153
154
155
156
157
158
159
160
161
162
163
164
165
166
167
168
169
170
171
172
173
174
175
176
177
178
179
180
181
182
183
184
185
186
187
188
189
190
191
192
193
194
195
196
197
198
199
200
201
202
203
204
205
206
207
208
209
210
211
212
213
214
215
216
217
218
219
220
221
222
223
224
225
226
227
228
229
230
231
232
233
234
235
236
237
238
239
240
241
242
243
244
245
246
247
248
249
250
251
252
253
254
255
256
257
258
259
260
261
262
263
264
265
266
267
268
269
270
271
272
273
274
275
276
277
278
279
280
281
282
283
284
285
286
287
288
289
290
291
292
293
294
295
296
297
298
299
300
301
302
303
304
305
306
307
308
309
#define TOUCH_MODULES_GT911

#include <Arduino.h>
#include <Wire.h>
#include <TouchLib.h>
#include <Arduino_GFX_Library.h>

// ============================================================
// JC4827W543C 螢幕設定
// ============================================================
constexpr int SCREEN_WIDTH = 480;
constexpr int SCREEN_HEIGHT = 272;

constexpr int LCD_BACKLIGHT = 1;

// QSPI LCD:
// CS = GPIO45
// SCK = GPIO47
// D0 = GPIO21
// D1 = GPIO48
// D2 = GPIO40
// D3 = GPIO39
Arduino_DataBus *bus = new Arduino_ESP32QSPI(
45,
47,
21,
48,
40,
39
);

Arduino_GFX *panel = new Arduino_NV3041A(
bus,
GFX_NOT_DEFINED,
0,
true
);

Arduino_GFX *gfx = new Arduino_Canvas(
SCREEN_WIDTH,
SCREEN_HEIGHT,
panel
);

// ============================================================
// JC4827W543C GT911 觸控設定
// ============================================================
constexpr int TOUCH_SDA = 8;
constexpr int TOUCH_SCL = 4;
constexpr int TOUCH_INT = 3;
constexpr int TOUCH_RST = 38;

TouchLib touch(
Wire,
TOUCH_SDA,
TOUCH_SCL,
GT911_SLAVE_ADDRESS1
);

// ============================================================
// 等待 USB CDC
// ============================================================
void waitForSerial()
{
unsigned long start = millis();

while (!Serial && millis() - start < 10000)
{
delay(10);
}
}

// ============================================================
// GT911 Reset
// ============================================================
void resetGT911()
{
Serial.println("Resetting GT911...");

// INT 拉低通常會讓 GT911 使用 0x5D 位址
pinMode(TOUCH_INT, OUTPUT);
digitalWrite(TOUCH_INT, LOW);

pinMode(TOUCH_RST, OUTPUT);
digitalWrite(TOUCH_RST, LOW);
delay(20);

digitalWrite(TOUCH_RST, HIGH);
delay(100);

// Reset 完成後,INT 恢復成輸入
pinMode(TOUCH_INT, INPUT);
delay(50);
}

// ============================================================
// I2C 掃描
// ============================================================
void scanI2C(TwoWire &wire)
{
Serial.println();
Serial.println("Scanning I2C bus...");

int found = 0;

for (uint8_t address = 1; address < 127; address++)
{
wire.beginTransmission(address);
uint8_t error = wire.endTransmission();

if (error == 0)
{
Serial.printf(
"I2C device found at 0x%02X\n",
address
);

found++;
}
}

if (found == 0)
{
Serial.println("No I2C devices found.");
}
else
{
Serial.printf(
"I2C scan complete: %d device(s)\n",
found
);
}

Serial.println();
}

// ============================================================
// 初始畫面
// ============================================================
void drawInitialScreen()
{
gfx->fillScreen(RGB565_BLACK);

gfx->fillRect(
0,
0,
SCREEN_WIDTH,
65,
RGB565_BLUE
);

gfx->setTextColor(RGB565_WHITE);
gfx->setTextSize(3);
gfx->setCursor(55, 20);
gfx->print("GT911 Touch Test");

gfx->setTextColor(RGB565_GREEN);
gfx->setTextSize(2);
gfx->setCursor(92, 105);
gfx->print("Touch anywhere");

gfx->setTextColor(RGB565_YELLOW);
gfx->setTextSize(2);
gfx->setCursor(62, 145);
gfx->print("Coordinates appear below");

gfx->setTextColor(RGB565_WHITE);
gfx->setCursor(120, 220);
gfx->print("Waiting for touch...");

gfx->flush();
}

// ============================================================
// 顯示觸控座標
// ============================================================
void drawTouchPoint(int16_t x, int16_t y)
{
// 若座標在螢幕範圍內才畫點
if (
x >= 0 &&
x < SCREEN_WIDTH &&
y >= 0 &&
y < SCREEN_HEIGHT
)
{
gfx->fillCircle(
x,
y,
7,
RGB565_RED
);
}

// 清除底部狀態列
gfx->fillRect(
0,
210,
SCREEN_WIDTH,
62,
RGB565_BLACK
);

char buffer[64];

snprintf(
buffer,
sizeof(buffer),
"Touch: x=%d y=%d",
x,
y
);

gfx->setTextColor(RGB565_WHITE);
gfx->setTextSize(2);
gfx->setCursor(105, 230);
gfx->print(buffer);

gfx->flush();
}

// ============================================================
// Setup
// ============================================================
void setup()
{
Serial.begin(115200);
waitForSerial();

Serial.println();
Serial.println("==============================");
Serial.println("JC4827W543C GT911 touch test");
Serial.println("==============================");

// 開啟 LCD 背光
pinMode(LCD_BACKLIGHT, OUTPUT);
digitalWrite(LCD_BACKLIGHT, HIGH);

Serial.println("Initializing display...");

if (!gfx->begin())
{
Serial.println("ERROR: Display initialization failed.");

while (true)
{
delay(1000);
}
}

Serial.println("Display initialized.");

drawInitialScreen();

// 先重設 GT911
resetGT911();

// 啟動觸控 I2C
Wire.begin(
TOUCH_SDA,
TOUCH_SCL,
400000
);

scanI2C(Wire);

Serial.println("Initializing TouchLib...");
touch.init();
Serial.println("TouchLib initialized.");
Serial.println("Touch the screen now.");
}

// ============================================================
// Loop
// ============================================================
void loop()
{
if (touch.read())
{
uint8_t pointCount = touch.getPointNum();

Serial.printf(
"Touch points: %u\n",
pointCount
);

for (uint8_t i = 0; i < pointCount; i++)
{
TP_Point point = touch.getPoint(i);

Serial.printf(
"[%u] x=%d, y=%d\n",
i,
point.x,
point.y
);

if (i == 0)
{
drawTouchPoint(
point.x,
point.y
);
}
}
}

delay(5);
}

Kubuntu 26.04 配置紀錄 (Kubuntu 26.04 Setup Notes)

本文將簡單記錄一些在 Kubuntu 26.04 上遇到的問題與解法。

Read more »

Introduction

UPS CP1000AVRLCDa 微開箱 之後,電池過了五、六年開開始無法蓄電,原本不太確定是 UPS 電路的問題或電池的問題,但想了一下以 UPS 相對簡單的模組(電路板 + 電池 + 螢幕),通常會壞掉的應該是電池而不是電路板,因此決定嘗試看看先換電池看續電是否正常(如果換完一樣是壞的就算了)。

Read more »

Create a Flask+uWSGI+Nginx Docker Image

In this example, we will create a Docker image for a Flask application using uWSGI and Nginx. The image will be based on the tiangolo/uwsgi-nginx-flask image, which is a popular choice for deploying Flask applications in production.

Read more »

Create a Private Docker Registry and Push/Pull Docker Images

In this guide, you will:

  1. Install Docker on an Ubuntu server
  2. Set up a private Docker registry on the Ubuntu server
  3. Create a Docker image on Windows and push it to the private registry
  4. Pull the image on the Ubuntu server and run it
Read more »

Create a ASP.NET Core Docker Image

This is a simple demo for creating a Docker image for an ASP.NET Core application.

Before starting, ensure you have the following requirements:

  1. Install Docker.

  2. Install the .NET SDK.

  3. Prepare an ASP.NET Core application. You can create a new ASP.NET Core Web API project using the following command:

    1
    $ dotnet new web -n Demo
Read more »

Introduction

This guide outlines the steps to set up an OpenVPN server on Ubuntu 24.04, including certificate management, server configuration, firewall setup, and client provisioning.

Read more »

Introduction

After enabling the OpenVPN server on an ASUS router, the exported client.ovpn file may trigger the following error in the OpenVPN client on Android:

1
OpenSSL: error:0A00018E:SSL routines:SSL_CTX_use_certificate:ca md too weak

This issue occurs because the CA certificate uses the SHA1 signature algorithm, which is outdated and considered insecure. Consequently, the OpenVPN client refuses to accept it.

There are two possible solutions:

  1. Insecure (Not Recommended): Allow weak CA certificates.
  2. Recommended: Renew the CA certificate using a stronger signature algorithm (e.g., SHA256 or higher).

Allowing weak certificates may expose your connection to man-in-the-middle (MITM) attacks or other vulnerabilities.

This guide walks you through the recommended solution.

Read more »

Introduction

This guide shows you how to set up rsync on a Windows system by leveraging Git Bash from Git for Windows.
rsync is a powerful file synchronization tool commonly used on Linux, but it can also work on Windows with a few manual steps.
No need to install WSL or Cygwin - just follow this lightweight and portable method.

Read more »